How to change your ink refills in my pens
Changing refills
Please scroll down for the different types of pens.
Fountain pens
Ballpoint pen (Cross® refill)
Rollerball pen
Ballpoint pen(Parker® refill)
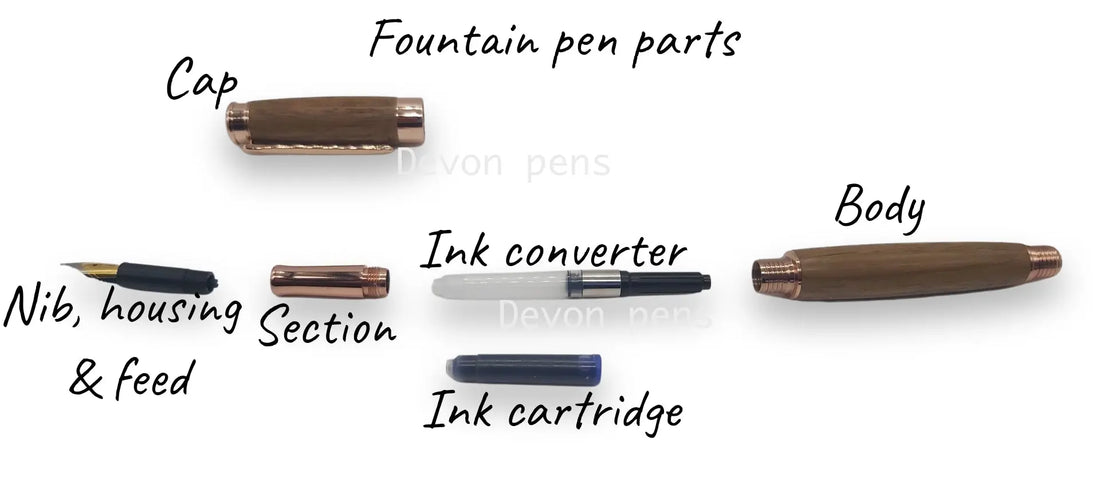
Fountain pen parts and how to refill and maintain your pen.

All the fountain pens that I supply make use of a standard international ink Cartridge. They are also supplied with an ink convertor to allow the use of bottled inks.
Ink Cartridge
To install the ink cartridge, you must first unscrew the section which is housing the nib. The ink cartridge should then be carefully pushed into the back of the section onto the raised part of the feed. This will puncture the cartridge releasing the ink into the feed. Replace the section into the pen and proceed to use the pen. The ink may take a little time to first flow from the nib.
Ink Convertor
Installed the same way as the ink cartridge. Before refitting into the body, the reservoir needs to be filled. Dip the nib into the ink u up to the breather whole in the nib. Then draw the ink in by turning the end of the convertor.
Ballpoint twist pens

The twist pen is made with two pieces of wood. The top Cap pulls away from the lower body to expose the top of the Cross-style refill. Sometimes gently twisting at the same time as pulling helps the cap come away.
Once exposed the refill is unscrewed from the lower body. Replacement is the reversal of removal. Once the two parts of the pen are together again it may be necessary to twist the two parts to align the grain again. I normally align the grain when the ink is fully retracted into the body.
Rollerball pen

All the rollerball pens I make use a standard rollerball ink refill.
To replace the ink refill, firstly unscrew the cap. Unscrew the rollerball section and remove the old refill.
Unlike ballpoint pens the spring is inserted first into the body of the pen.
Installation of the refill is the reversal of removal.
Ballpoint pen Parker® refills

The above style of pen makes use of a standard Parker® type ink refill. This is also known as a G2 type refill. Please note there are a number of variations to the pens above and each may be different. This is an example of how the pen is assembled and is not the same for all pens that may look similar. Please do not try to force any pen apart as it may break. If you need more help please just ask.
The top of the pen labelled twist cap above, should be unscrewed to gain access to the end of the ink refill.
The refill can then be withdrawn, the spring will quite often come out with the refill and care should be taken not to lose this.
Installation is the reverse of the removal above. When replacing the refill fit the spring to it first and lower both parts into the pen careful to ensure the spring and refill are seated correctly. If in doubt pull the refill out a little way and gentle drop it back in. If it bounces on the spring it has seated correctly, go ahead and replace the twist cap.
Occasionally through mishandling the thread at the end of the twist cap can become pushed too far into the cap to engage in the thread of the pen body. This can be corrected by pulling it back down slightly to allow it to connect again.
